
Overview about the journey
I have 0 knowledge about kotlin as well as creating Android APK. Most of the things that I mentioned below is also my first time.
PART 0
Here’s the part where I started out by exploring how to create an Android APK. Basically just tons of youtube vidoes and blogs. The final decision? I just go with Android Studio. The installation is simple but remember to download system image for Virtual Device which is also a part of Android Studio.
PART 1
Here’s the part where I tried the classic “hello world” in kotlin. It took me some times to understand how it works but learning “hello world” is useless as I wanted to create an APK that accepts input and check the input after clicking the button. So there’s goes another round of youtubes and blogs. The conclusion of this is just keep copy other people’s code to understand more about the code.
Here’s something crucial before you move on to the next part if you wanna copy my code, if you paste the code and some of the code turn red, just right click and import whatever its needed. It works 99% of the times.
PART 2
Here’s the part where I’ll explain abit of the code that I copy wrote. Lets start with MainAcitiviy.kt, this is the main file where most of the code will be written in a single program since I’m writing it for the first time.
1
2
3
4
5
6
7
8
9
10
11
12
13
14
15
class MainActivity : ComponentActivity() {
    override fun onCreate(savedInstanceState: Bundle?) {
        super.onCreate(savedInstanceState)
        enableEdgeToEdge()
        setContent {
            Shroomish_Flag_CheckerTheme {
                Scaffold( modifier = Modifier.fillMaxSize() ) { innerPadding ->
                    CustomA(
                        modifier = Modifier.padding(innerPadding)
                    )
                }
            }
        }
    }
}
Most of the code in this section is auto-generated. I modified slightly to change the default function into my own function CustomA. As for modifier, you can just think of controlling the behaviour of the function.
1
2
3
4
@Composable
fun CustomA( modifier: Modifier = Modifier) {
    ...
}
As I mentioned previously, I created my own function CustomA. A parameter of modifier is required in order to match the innerPadding. Inside the function, I started by including an image as my APK background.
1
2
Image(painter = painterResource(id = R.drawable.shroomish), contentDescription = null
    , modifier = modifier.fillMaxSize() )
To do so, go to Resource Manager and Import Drawables. Then just select the images and remain everything as default. After importing the images, you could just use R.drawable.<your-image-name> to retrieve the images.
1
2
3
4
5
Column(modifier = Modifier.fillMaxSize(),
        verticalArrangement = Arrangement.Bottom,
        horizontalAlignment = Alignment.CenterHorizontally){
            ...
}
The next section is Column, which basically arranges everything in vertical sequence. The modifier is just trying to make it center and put it at bottom.
1
2
3
4
5
6
7
8
9
var a by remember { mutableStateOf("") }
OutlinedTextField(
    value = a,
    onValueChange = { a = it },
    label = { Text("Flag check") },
    shape = RoundedCornerShape(20.dp),
    modifier = modifier
        .fillMaxWidth().background(color = Color.White,shape = RoundedCornerShape(20.dp))
)
This section is where I created a text field. Basically the final value will be stored inside a and remaining it just trying to beautify the text field.
1
2
3
4
5
6
7
8
9
10
11
12
13
14
val wee = LocalContext.current.applicationContext
Button(onClick = {
    if(wee().eee(wee().ed(a))){
        Toast.makeText(wee, "Correct Flag", Toast.LENGTH_SHORT).show()
    } else {
        Toast.makeText(wee, "Nope", Toast.LENGTH_SHORT).show()
    }
}, colors = ButtonDefaults.buttonColors(Color.Black),
    shape = RoundedCornerShape(20.dp),
    contentPadding = PaddingValues(start=60.dp, end=60.dp,top=8.dp, bottom=8.dp),
    modifier = modifier.padding(bottom=200.dp)
){
    Text(text = "Check Flag", fontSize = 22.sp, color = Color.White)
}
This section is the button of the APK. the first line wee variable is actually used for the “pop up message” in the APK. As written in the code, it will trigger an if-else statement and there will be a message popped if the button was clicked. The remaining of the code is just to beautify the button.
Here’s an overall outcome of the APK:

While it’s kind of ugly, it works so lets just move on from there.
PART 3
If you really read everything, you will probably think that why I did not explain the if-else statement in the button. Thats because it’s for PART 3. If you looks closely, you will think that what’s wee().eee(wee().ed(a)). Basically, wee() is a class which is stated in another file. Kotlin have this feature where you could just declare the class in any file and still use it on other files without the need of importing it. here’s the following code for wee() class.
1
2
3
4
5
6
7
8
9
class wee {
    init {
        System.loadLibrary("shroomish_flag_checker")
        System.loadLibrary("whatsfun")
    }

    external fun eee(input: String): Boolean
    external fun ed(input: String): String
}
This is just a simple class that load’s 2 libraries and make the functions available to public. So what libraries are those ? it’s actually my own custom library that requires C++.
PART 4
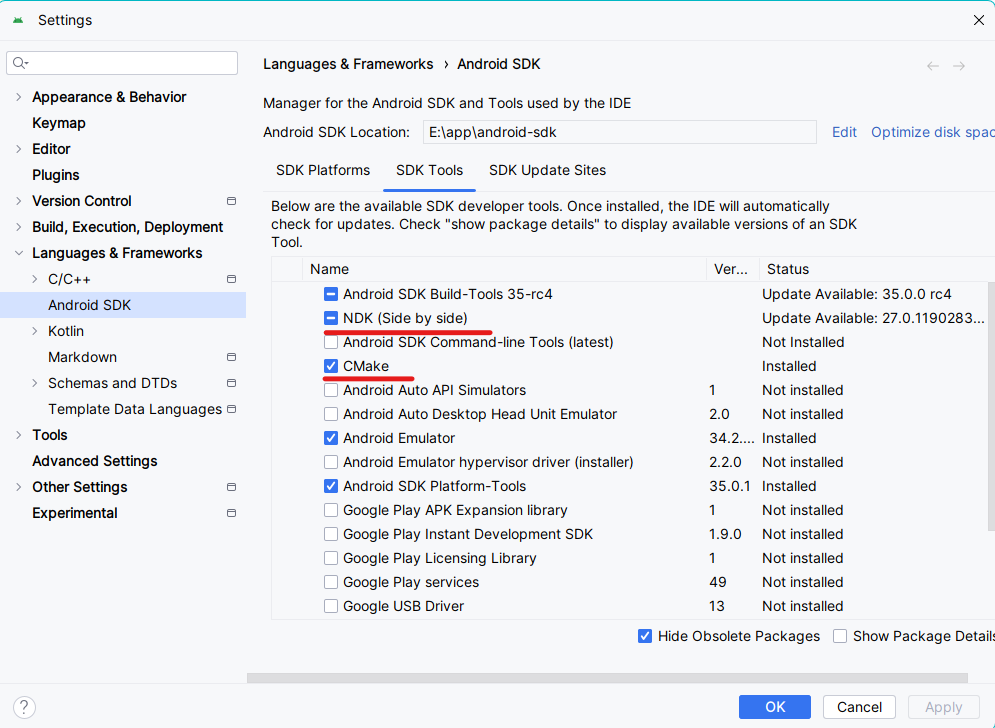
Here’s the part where I’ll explain briefly on how you could write C++ and use it in Android APK. To make this work, you will need to go to Tools > SDK Manager > Languages & Frameworks > Android SDK > SDK Tools > **tick** NDK and CMake and press OK to install the needed tools.
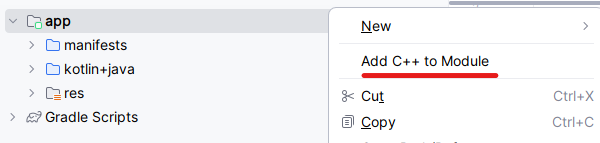
After the tools are installed, right click on the app and click Add C++ into Module and just click ok with the default option.
After that, you should get your own C++ files that has alot of comments in it. Just remove it and replace with this.
1
2
3
4
5
6
7
8
9
10
11
#include <jni.h>
#include <string>

extern "C"
JNIEXPORT jstring JNICALL
Java_com_example_shroomish_1flag_1checker_wee_ed(JNIEnv* env, jobject /* this */, jstring input) {
    const char* inputCStr = env->GetStringUTFChars(input, nullptr);
    std::string g = std::string(inputCStr);
    env->ReleaseStringUTFChars(input, inputCStr);
    return env->NewStringUTF(g.c_str());
}
The important part of this code is the Java_com_example_shroomish_1flag_1checker_wee_ed. You will need to change it to Java_com_example_<yourproject>_<filename>_<functionname>. Aside from that, most of it are kind of important but you dont really need to know expect that the g is where your input will goes and return will return your strings.
this C++ code only returns strings. If you want to return another data type, EXPLORE YOURSELF
FINAL PART
I actually did not explain my own code nor published it in this blog. If you really want to look into my C++ code, you could just go to my github and I have upload the whole project there. While I did not mention chatgpt, it actually helps a lot cause C++ is another nightmare. For those that want to try my challenge, I have uploaded the APK as well.